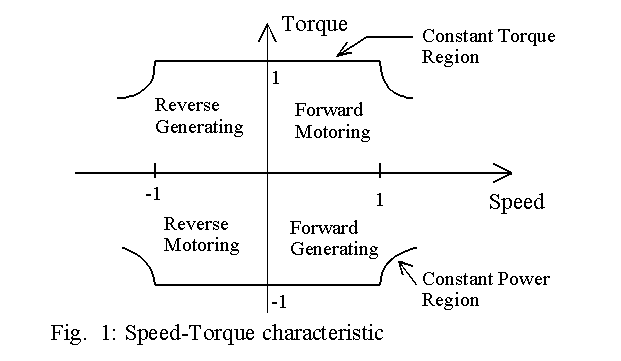
This page describes how a separately-excited dc shunt motor can be operated in either direction in either of the two modes, the two modes being the motoring mode and the regenerating mode. It can be seen that the motor can operate in any of the four quadrants and the armature of the dc motor in a fast four-quadrant drive is usually supplied power through a dual converter. The dual converter can be operated with either circulating current or without circulating current. If both the converters conduct at the same time, there would be circulating current and the level of circulating current is restricted by provision of an inductor. It is possible to operate only one converter at any instant, but switching from one converter to the other would be carried out after a small delay. This page describes the operation of a dual converter operating without circulating current.
As shown in Fig. 1, the motor is operated such that it can deliver maximum torque below its base speed and maximum power above its base speed. To control the speed below its base speed, the voltage applied to the armature of motor is varied with the field voltage held at its nominal value. To control the speed above its base speed, the armature is supplied with its rated voltage and the field is weakened. It means that an additional single-phase controlled rectifier circuit is needed for field control. Closed-loop control in the field-weakening mode tends to be difficult because of the relatively large time constant of the field.
The power circuit of the dual-converter dc drive is shown in Fig. 2.
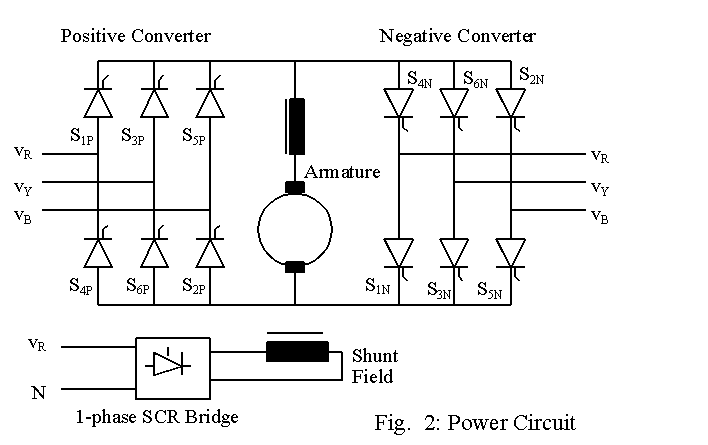
Each converter has six SCRs. The converter that conducts for forward motoring is called the positive converter and the other converter is called the negative converter. The names given are arbitrary. Instead of naming the converters as positive and negative converter, the names could have been the forward and reverse converter. The field is also connected to a controlled-bridge in order to bring about field weakening.
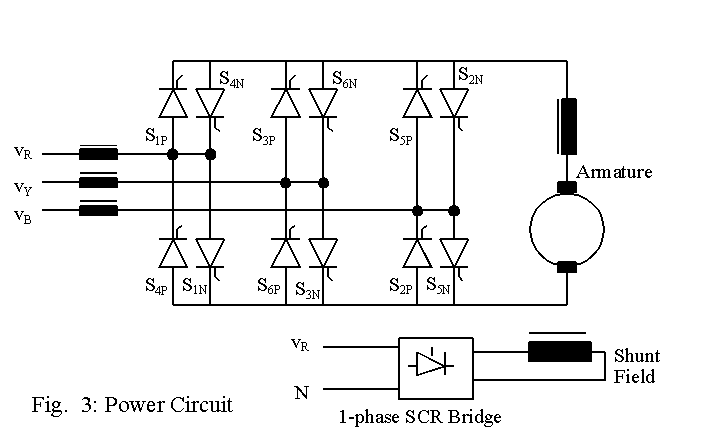
The circuit shown above can be re-drawn as shown in Fig. 3. Usually an inductor is inserted in each line as shown in Fig. 3 and this inductor reduces the impact of notches on line voltages that occur during commutation overlap.
The operation of the circuit in the circulating-current free mode is not very much different from that described in the previous pages. In order to drive the motor in the forward direction, the positive converter is controlled. To control the motor in the reverse direction, the negative converter is controlled. When the motor is to be changed fast from a high value to a low value in the forward direction, the conduction has to switch from the positive converter to the negative converter. Then the direction of current flow changes in the motor and it regenerates, feeding power back to the source. When the speed is to be reduced in the reverse direction,
the conduction has to switch from the negative converter to the positive converter. The conduction has to switch from one converter to the other when the direction of motor rotation is to change.
At the instant when the switch from one converter to the other is to occur, it would be preferable to ensure that the average output voltage of either converter is the same. Let the firing angle of the positive converter be aP, and the firing angle of the negative converter be aN . If the peak line voltage be U, then equation (1) should apply. Equation (1) leads to equation (2). Then the sum of firing angles of the two converters is p, as shown in equation (3).
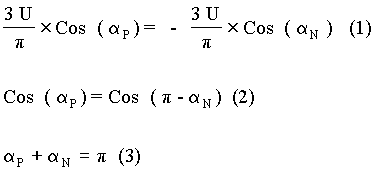
In a dual-converter, the firing angles for the converter are changed according to equation (3). But it needs to be emphasized that only one converter operates at any instant.
When the speed of the motor is to be increased above its base speed, the voltage applied to the armature is kept at its nominal value and the phase-angle of the single phase bridge is varied such that the field current is set to a value below its nominal value. If the nominal speed of the motor is 1500 rpm, then the maximum speed at which it can run cannot exceed a certain value, say 2000 rpm. Above this speed, the rotational stresses can affect the commutator and the motor can get damaged.
Next it is shown how the operation of motor can be represented by means of a block diagram. This approach can be helpful in designing the closed-loop system.
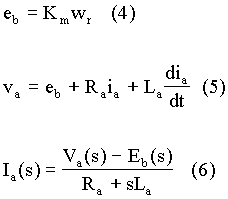
Let the field excitation be assumed to remain constant at its nominal level. Let the voltage applied to armature be va volts, the back e.m.f. eb volts and rotor speed wr rad/s. The back emf is expressed by equation (4), where Km is the coefficient relating speed of motor to its back emf. If Ra be the resistance of armature and La its inductance, then the applied armature voltage equals the sum of the motor back e.m.f, the drop across its armature resistance and the drop across the armature inductance, as shown in equation (5). In equation (5), va is the voltage applied to the armature and ia is the current though the armature. The above equation can be represented in terms of Laplace transform, leading to equation (6).
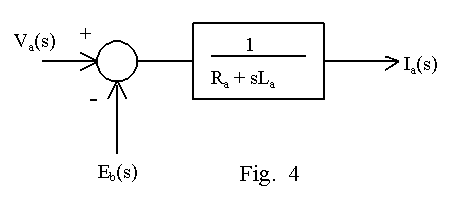
The block diagram shown in Fig. 4 represents equation (6).
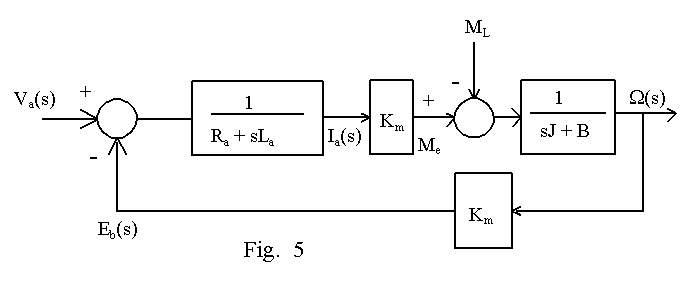
Given that the excitation of the motor is constant and that the effects of armature reaction are negligible either due to interpoles or series compensation winding, the torque output Me can be expressed as shown in equation (7). If the load torque be ML N-m, the combined polar moment of inertia of motor and load be J kg.m2 and its friction coefficient be B N-m/rad/sec, then the torque output of motor equals the expression on the right-hand side of equation (8). Equation (8) can be represented in terms of Laplace transform, as shown in equation (9), where the Laplace transform of w, the motor speed, is assigned to be W(s). A block diagram, as shown in Fig. 5, can now be drawn based on equations (4), (6), (7) and (9). It can be seen that unit for Km is N-m/A.
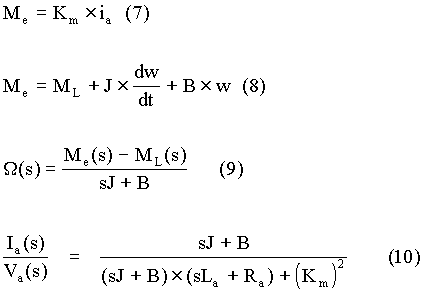
With the load torque set to zero, a transfer function linking current Ia(s) and the input voltage Va(s) can be obtained. It is expressed in equation (10).
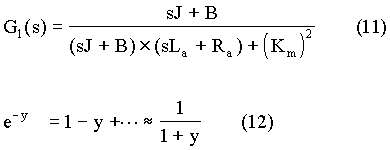
The reason for obtaining this transfer function is to facilitate the design of a controller for controlling the armature current. The two output parameters of interest are the torque and the speed. The armature current is selected as one of the state-variables to be controlled in closed-loop, since the torque output varies linearly with it. It is preferable that the variable to be controlled by negative feedback is a variable that reflects some energy stored in a system. Here the armature current reflects the energy stored in the inductance in the armature circuit. If the motor has a compensating winding and/or a compound winding, the inductance of this winding should be added to La. In some drives, an additional inductor is used in series with the armature and this value should also be added to La. Let G1(s) reflect the transfer function in equation (10) and equation (11) reflects the change. The part of the closed-loop system that is usually used for controlling the armature current is shown in Fig. 6.
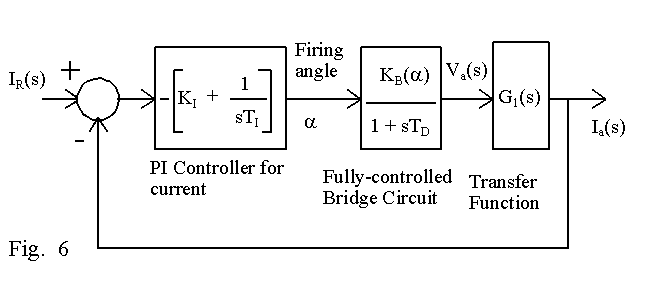
The block diagram in Fig. 6 is now described. If the armature current is to be controlled in closed-loop, it is necessary to have a current reference signal, marked as IR(s) in Fig. 6. This signal is internally generated, most often as the output of the controller for speed and it is shown later how that is achieved.
It is possible to use a controller other than a proportional plus gain(PI) controller. A PDF controller(a pseudo-derivative controller) or a PID-controller can be used. But a PI controller is often sufficient, since the integrating part of the PI controller leads to zero steady-state error for a step input and the proportional gain can be adjusted to yield fast response and stability. The output of the current controller is often a voltage which sets the firing angle for the fully-controlled bridge circuit. Since the gain KB(a) is negative, the sign of both the proportional gain KI and the integrating time-constant TI should be negative in order to keep the loop-gain of the system represented by block diagram in Fig. 6 negative.
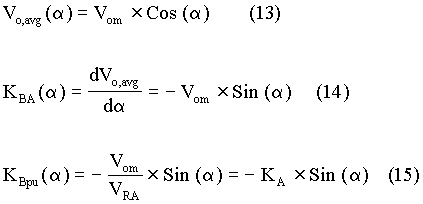
A variation in the output of the current controller does not change the firing angle instantaneously since the SCRs in the bridge are triggered in a sequence at an interval of 60o on the average and there is a delay before the change in the output of the current controller has an effect on the firing angle. This delay can be classified as a transportation lag and it can be approximated by a first-order transfer function, as shown in equation (12). In equation (12), y has been used in place of sTD.
For a system with 50 Hz input source, one-sixth of a cycle is about 3.3 ms and then the delay TD can be set to be half of that value, that is 1.67 ms. What is carried out is an approximation to facilitate the design of current controller.
As the firing angle a increases, the instant of triggering of each SCR is delayed more and more from its reference point corresponding to 0o firing angle. When the current flow in the dc link is continuous, the average output voltage of the bridge changes from its positive maximum average value to its negative maximum average value, as a is allowed to very from 0o to 180o. In order to ensure that the loop gain is negative, it is necessary that the gain due to controlled rectifier circuit is inverted. It is explained later how it can be brought about for practical realization.
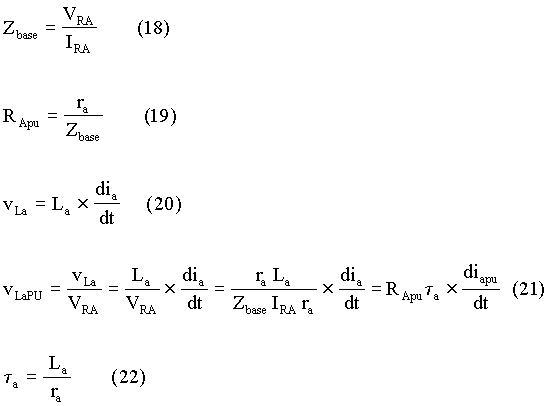
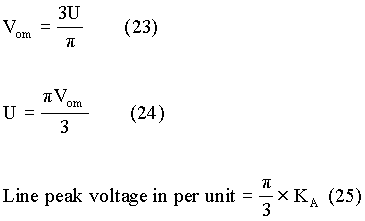
Another point to be noted is that the gain of the controlled rectifier is not constant and it varies with firing angle. Let the maximum average output voltage be Vom. Then equation (13) shows how the average output voltage at any firing angle, a, is obtained. The actual gain of the controlled rectifier is defined by equation (14). If the rated armature voltage, VRA, is assigned to be the base voltage, then the gain of the controlled rectifier in per unit notation can be defined as in equation (15).
In equation (15), KA defines the ratio of peak line-to-line voltage to the rated armature voltage. It is seen that the gain varies and hence the controller has to be designed such that it operates properly over this range of variation.
It is better to design the current loop first before the outer loop design is attempted. But it is necessary to describe the per unit notation that is adopted here. Let the rated armature voltage VRA be the base voltage. Then equation (16) is valid. As shown in equation (17), the rated armature current IRA is chosen to be the base current.
Per Unit Value of Rated Armature Voltage = 1 (16)
Per Unit Value of Rated Armature Current = 1 (17)
Then the base impedance for the armature circuit is obtained as shown in equations(18) whereas equation (19) shows how the per unit value of armature resistance can be obtained if it is ra W. Given that the inductance present in the armature circuit is La H, the voltage across it is obtained as shown in equation (20). Equation (21) is obtained by dividing both sides of equation (20) by VRA. Equation (21) uses symbol ta, representing the time constant of the armature circuit and it is defined by equation (22).
For a 3-phase controlled-bridge rectifier circuit, the maximum average output voltage that can be obtained at 0o firing angle is shown in equation (23). Then the amplitude of line voltage of 3-ph supply is described by equation (24). The per unit value of the peak line voltage is obtained from equation (25).
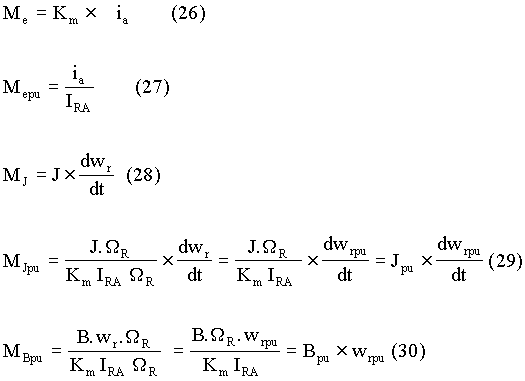
We have seen so far how voltages, currents and impedances related to armature circuit can be expressed in per unit values. Next, it is shown how the torque developed, moment of inertia J and friction coefficient B can be expressed in per unit values. Let the torque developed by motor be Me N-m. Then when the motor is operating with the nominal or the rated flux, the torque developed by motor is defined by equation (26), where ia is the armature current. Also, let wr be the armature shaft speed in rad/s. Then the per unit value of the torque developed is expressed as shown in equation (27), where IRA is the rated armature current.
The per unit value of moment of inertia is obtained as follows. Let WR be the rated shaft speed in rad/s, and the moment of inertia of motor and the coupled load be J kg-m2. Let the torque required to accelerate this moment of inertia be MJ. Then equation (28) can be used to relate J and MJ. Dividing both sides of equation (28) by the rated torque, we get equation (29). From equation (29), it is seen how the per unit value of the moment of inertia can be obtained. Similarly, we can get an expression for friction coefficient, as shown by equation (30).
It is necessary to state how the parameters for the current controller should be specified. The gain, KI , is just a ratio whereas the time constant, TI , should be specified in seconds.
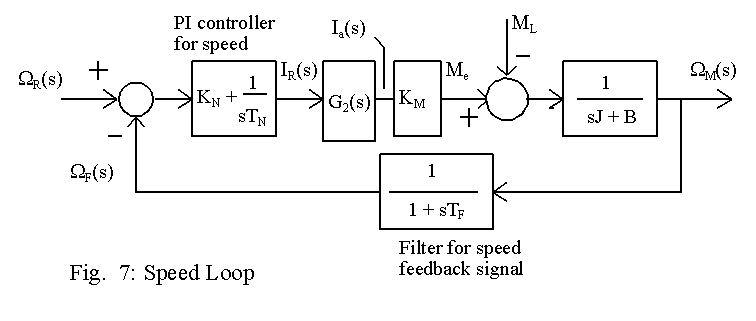
Before the design of speed loop is to be attempted, the current loop should be approximated by a suitable transfer function. The block diagram in Fig. 6 can be expressed by a transfer function, say G2(s). Then G2(s) = Ia(s)/IR(s). Using G2(s), the speed loop can be represented as shown in Fig. 7. Again a PI controller is used and it may be necessary to provide a filter in the path of speed feedback signal. The time constants are to be specified in seconds. In per unit notation, the value of KM marked in Fig. 7 would be 1.
PARAMETERS IN PER UNIT NOTATION
At first, typical per unit values are obtained from the datasheet of a dc motor. Then it is shown how the current loop can be designed. Next, the design is verified by simulation. Finally, the speed loop design is illustrated.
In the per-unit calculations, a per unit value of 1 is assigned to the rated armature voltage, the rated motor speed and the rated armature current. From the values of the rated armature voltage and the rated motor speed, obtain Km, the coefficient for the motor. Then other per unit values can be obtained as outlined earlier. The applet displayed below computes the per unit values given the actual values. The textfields contain default values and the applet computes and displays the per unit values when the Compute Button is clicked.
The transfer function G1(s) expressed as equation (11) can expressed in terms of per unit values and then Va(s) and Ia(s) marked in Fig. 6 would be values in per unit notation. Conversion of equation (11) such that it conforms to the per unit notation is explained below.
Both the numerator and the denominator of expression in equation (11) can be divided by BRa. The ratio of J/B can be represented as the mechanical time constant, tm. The resulting expression for G1(s) presented as equation (31). Then equations (32) and (33) explain how equation (31) can be converted such that it is in per unit notation.
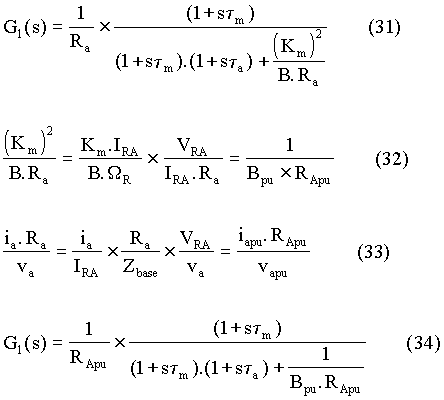
The block diagram shown in Fig. 6 conforms to per unit notation. Here G1(s) is expressed by equation (34) and Va(s) and Ia(s) marked in Fig. 6 are values in per unit notation. Using (34), the transfer function, G2(s) representing the block diagram in Fig. 6 can be represented as shown below. In this case, the controlled-rectifier is assigned to have its highest gain, KA. It is logical to do so, because the system designed for stability at gain KA would be stable at lower gains too.
The second applet in this page finds the location of the poles and zeros of the closed-loop system in Fig. 6, given the necessary data. It is seen for a wide range of controller parameters, the zeros are located such that they cancel almost two poles. The other two poles are located away from the origin. It is seen that the design of current controller is fairly easy.
It is necessary to design the speed controller next. To design the speed controller, it is necessary to represent the transfer function G2(s) suitably. It is found that for a wide range of values, two of the zeros of G2(s) are located near two of the poles and the other two poles are away from the origin. Hence while designing the speed loop, G2(s) is set equal to unity. The simulation of the drive presented later would show whether this simplification is justified.
The design of the speed controller is carried out based on the assumption that the motor is on no load. A variable drive system tends to exhibit oscillatory behaviour under no load conditions and hence the design based on no load condition is assumed to be justified. Here the output of the speed controller is not clamped, whereas there would be limits on the output of speed controller. The output of speed controller corresponds to armature current and it is necessary to limit the peak value of speed controller in order to protect the SCRs used in the bridge. The applet presented later for simulating the drive has limits imposed on the output of the speed controller.
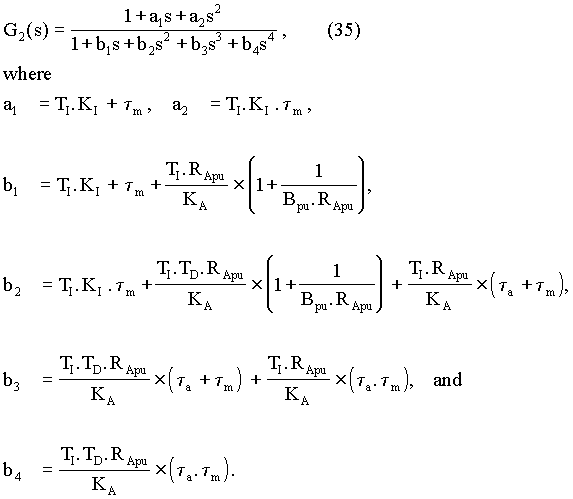
The block diagram for closed-loop operation with the field controller in action turns out to be somewhat complex. The interaction that occurs within a separately-excited DC motor is first presented in Fig. 8.
The block diagram in Fig.8 is now described. The filed current, marked as IF, produces magnetic flux in the motor and the back e.m.f of the motor is then proportional to the product of the field current and the speed of the motor. This statement is based on the assumption that the field flux in the motor is not saturated and that the field flux varies linearly with the field current. If the field current is in per unit notation, where the filed current corresponding to the rated current equals unity, then the back emf can be shown to be equal to Km × iF × wR, where both Km and wR are also in per unit representing the motor coefficient and the speed of the motor. Once the back e.m.f and the applied voltage are known, the armature current can be obtained as shown in Fig. 8. From the values of armature current and field current, the torque output of motor is obtained and the speed of the motor changes as shown.
For design of field controller, the block diagram in Fig. 8 is too complex. The design is carried out using a simplified or a simplistic block diagram and the performance of the controller is evaluated using the final simulation program, which uses a model that is reasonably close to real system.
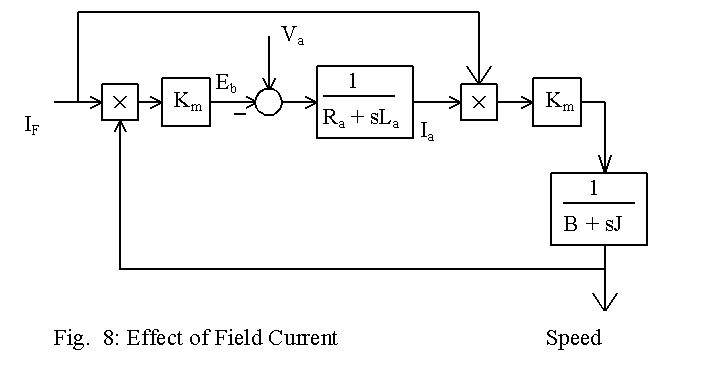
The design of field controller is based on the block diagram shown in Fig. 9.
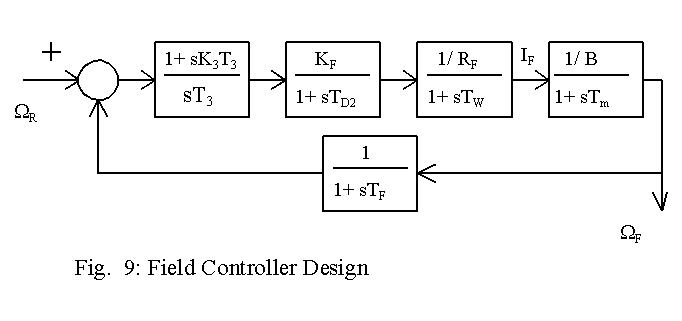
It is easy to represent the block diagram in Fig. 9 in per unit notation. The gain of the controlled bridge for the field circuit is KF. Its value equals the ratio of the maximum rate of bridge output voltage to the rated voltage of the field circuit and normally the value of KF is likely to be near 1.2. The delay due to firing circuit is again approximated by TD2, and it is set equal to (1/4f), where f is the frequency of the ac source. Then the field current is obtained in per unit value and it can be made equal to the torque, assuming that the armature circuit has comparatively a small time constant and that the armature current stays at the rated value. The friction coefficient, the mechanical time constant and the time constant of the filter in the speed feedback signal are the same signals used for design of the speed controller. The applet below can be used to design the field controller. This applet runs somewhat slowly. The poles and zeros are calculated for the block diagram shown in Fig.9, whereas the step response is obtained using the block diagram in Fig. 10.
The design of field controller is somewhat difficult because both the field circuit time constant and the mechanical time constant are relatively large.
The applet displayed below shows step response of the
drive with the field controller.
LOGIC FOR FOUR-QUADRANT
OPERATION
For four-quadrant operation, the scheme outlined in this page makes use of two converters, called the positive converter and the negative converter. It has also been shown that the sum of the firing angles of the two converters should be p radians. Hence the synchronizing signals for the SCRs in both converters can be obtained as shown in Fig. 11.

It is also necessary to find out when the switch from the positive converter to the negative converter or vice-versa can be made. One possible method is outlined in Fig. 12. Based on the polarity of current reference signal, a logic signal, called W can be developed. A comparator can be designed to yield an output of 1 (W =1 ) when the current reference signal is positive and an output of 0 (W =0 ) when the current reference signal is negative. Along with W, another signal can be derived based on the armature current. A signal, called Enable, can be produced such that Enable is 1 when the armature current is zero. When Enable is 1, the output of a flip-flop can be set. Output Q takes on the polarity of W signal. When both W and Q are at logic 1, the positive converter is allowed to be triggered. When both W and Q are at logic 0, the negative converter is allowed to be triggered.
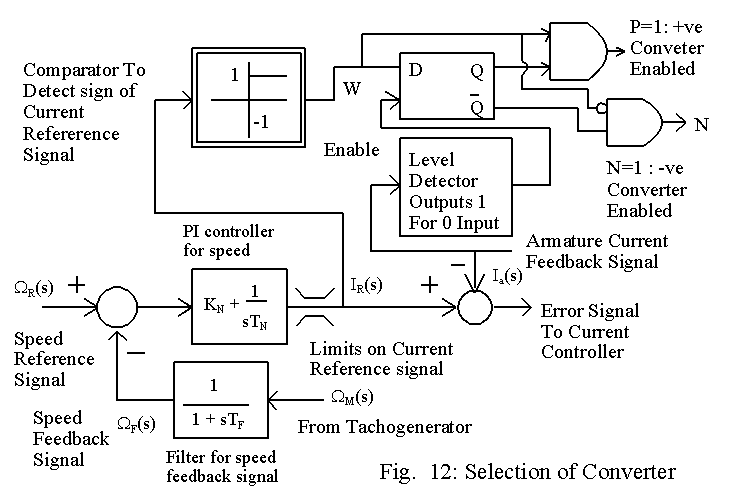
The rest of the control arrangement for generating the firing signals is shown in Fig. 13. The block diagram shows that there are active limits on the firing angle. The voltage output of the bridge can be sensed and when it is at about 1.05 times the rated armature voltage, the firing angle may not be allowed to become any smaller.
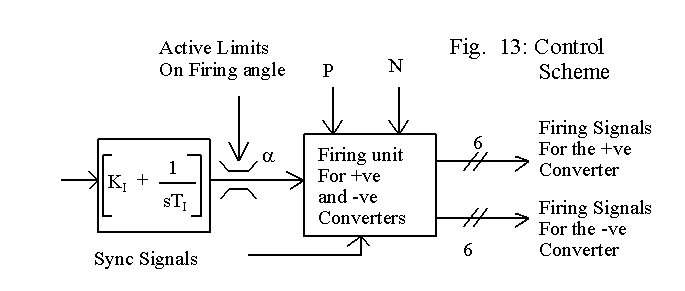
The variation of firing angle towards either 0o or 180o can be blocked, avoiding further rise in the output voltage. It is better to have a provision that would allow for varying the limiting values to accommodate changes in source voltages. It would not be difficult to implement such a scheme for a micro-controller based control system.
SWITCH-OVER OF CONTROL FROM ARMATURE TO FIELD
Field control is necessary above the base speed of the motor and the field current has to vary only over a limited range, say from 0.6 pu to 1 pu. The signal that sets the active limits on the firing angle for armature control can be used also for field control. The block diagram related to field control is shown in Fig. 14.
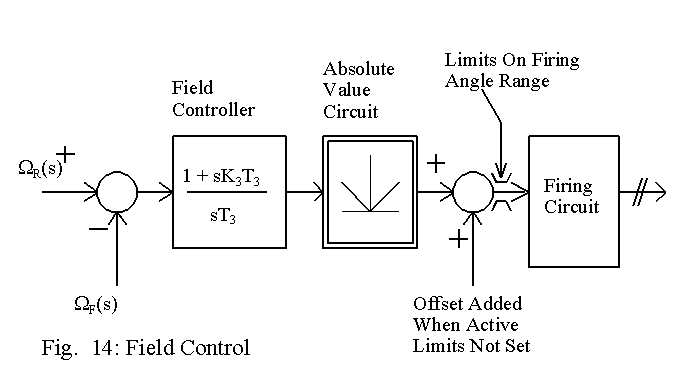
When the active limit is not set, the firing angle of the field controller is set such that the field current remains at the nominal value. When the active limits are applied to the armature control circuit, the firing angle is varied such that the field current gets adjusted to the value required for the speed reference set.
SIMULATION OF THE FOUR-QUADRANT DRIVE
Before selecting the type of response, set the value of the selected parameter. When you select a parameter, the textfield shows the default value set inside the program. Change the parameter value if you want to and then you must click on the SET VALUE button for the change to take effect. You can go from one type of response to another after the present calculations are carried out. When you have selected a new type of response, you must click on Click to Start. If you click on Reset button, initializing routine is carried out and the motor speed is set to zero, and the other values are also reset. It is possible to see the effect of step changes in speed or load or unbalance in source or unbalance in firing circuit.
This page has illustrated how a four-quadrant DC drive
operates. The next section shows how semi-controlled bridge rectifiers
operate.
![]()
![]()
![]()
![]()
